Pages

Saturday, August 20, 2011

SGN-8T : Modular PVC Turret Design - Build Guide!

This was a side project that i worked on back in 2010, i completed almost 90% of it, but ended up shelving the parts 'cos i shifted my focus onto other modding projects.

Recently, i've been modding a few blasters which came in single barrel designs, they have great performance but with all the new blasters available nowadays with much higher ammo capacity and RoF, single barrel blasters tend to be at a slight disadvantage in Nerf games, so i resumed working on modular PVC turret designs to further improve the effectiveness of those single barrel blasters.

Some modders may have also seen the excellent 8-shot turrets made by SorrowX at the NerfHaven forum, he used a 3D printer to create his turret parts and the result is nicely made parts... though unfortunately the parts creation process itself is largely inaccessible to most of us modders.

My modular turret design aims to achieve a similar goal, except that it does not require a 3D printer, just PVC pipes and epoxy glue. :)

Here is the process...

Step 1:

These are the basic materials and tools that you'll need.


- 13mm / 16mm / 20mm SingaPlastics PVC Pipes (Thinwall Versions)
- 1/2" PETG Tubes (.528" ID / .572" OD)
- 2-Part Epoxy Glue (I use Selleys Super Strong Epoxy Glue)
- Pipe Cutter

Note that all the pipes and tubes i use are able to nest within each other. This turret design is built around those material specifications.

Its also possible to make this turret with non-nesting pipes and tubes too, you'll just have to adapt the parts to fit and align with each other.


Step 2:

We will start with the barrel spacers first.

For each barrel spacer, cut 8 x 1cm length 13mm PVC pipe and 1 x 1cm length 20mm PVC pipe. Ensure that the cuts are even and matching, avoid making angled or uneven cuts.

Use the pipe cutter's reaming tool or a hobby knife to trim off any sharp bits sticking out, so that the barrel spacer ports have a smooth surface.

Position the smaller pipe rings in a balanced circle around the central large pipe ring, then fill the space in between with epoxy glue. Constantly make sure that the parts are all aligned properly.


I did the gluing process in stages. The glue is applied in successive layers, each time the glue is properly cured for a few hours before the next layer is applied. After 3-4 layers, the space will be filled in nicely and forms a very tough bond between the parts.

Do this twice to create 2 x barrel spacers.


Step 3:

Next will be the PETG barrel assembly.

In my example, i use 1ft length barrels.

Cut 8 x 1ft PETG tubes and slot them into the barrel spacers, check that they are all aligned.


Do NOT glue the barrels in yet! We still need to mount the barrels onto the main turret assembly later.
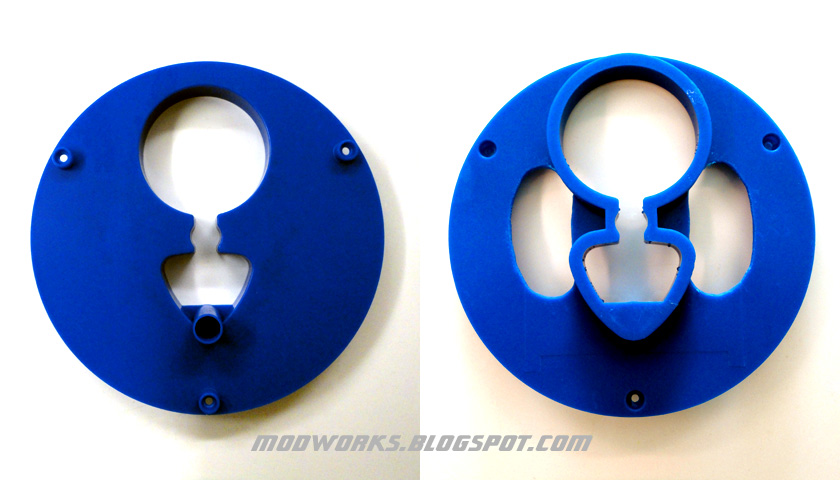

Step 4:

This is the main component of the turret system, which comprises of the connection and turret rotation points.

Cut 1 x 4.5cm length 16mm PVC pipe, 1 x 2cm length 20mm PVC pipe and 1 x 2cm length 16mm PVC pipe.

Epoxy glue them together vertically, make sure they are aligned with the barrel spacer positions.


Step 5:

Build up the rest of the turret fitment parts.

Note that i design my turret connection point to connect to 20mm pipe couplers which i use in all my modded blasters, if you use other kinds of couplers, you'll have to adjust accordingly.

Cut 1 x 2cm length 20mm PVC pipe (as the connection point), 1 x 4.5cm length 13mm PVC pipe (to slot into the main nozzle to reduce deadspace), 1 x 5cm length 16mm PVC pipe (as the barrel spacer holder and rotation point) and 1 x 1cm length 13mm PVC pipe (as a base for the bottom turret "barrel stopper", explained later).


Epoxy glue everything in.


Step 6:

Prepare the turret system.

Cut out a suitable sized ring of foam padding and attach it on the top nozzle for the turret seal, put a rubber o-ring around the middle rotation point (i used a Nerf Stampede o-ring, apply grease to it so that the rotation is smooth) and stack some foam inside the bottom section along with a dome shaped stopper (i used a plastic button from a coat).


The dome shaped part at the bottom acts as a "barrel stopper", when the turret turns, the stopper will be pushed back and compress the foam behind, then when the next barrel is in position, the stopper pops back forward and locks the barrel in place.

My earlier designs used a toothed clutch system, but i found that too troublesome to make (alot of tedious precision cutting of the PVC sections needed), and they were not really required since there isn't an integrated auto-rotation mechanism anyways.... the system just required something simple to hold the barrels in place.


Step 7:

Connect the turret system to the barrel assembly.

I used 1 x 1cm length 16mm PVC pipe as a fastening collar to secure both components together, bolted on with 2 x machine screws. This also facilitates easy changing of parts if required.


The fit of the fastening collar is very important, make sure it secures the parts tightly (but still allowing smooth rotation with the o-ring), this keeps the barrel assembly constantly level with the air exit nozzle at the top section. This is essential to achieve 100% turret air-seal.

The barrels can now be glued in permanently if you wish... but in my case i leave them secured by friction fit, i've test fired hundreds of shots and they all still stay in position (just adding an extra layer of tape on the looser barrels did the trick), so i can also have the option to change the barrels anytime if needed.

Every barrel has been tested with 100% turret air-seal, the plunger stops mid-way when the barrel is blocked and it can even vacuum load foam darts too. :)


Completed SGN-8T : Modular PVC Turret!


Here is an example of the Modular PVC Turret fitted on a modded PAS with a 20mm coupler connection... i call it PAS-8T.


Rear loading ammo slots, 3 on each side = 6 rear loading slots in total.


The turret can be easily swapped between blasters with compatible coupler connections. :)


Demo Video!


.

Friday, August 19, 2011

Nerf Vortex Praxis - Internals Guide!

This guide will serve as a reference for the internals of the Nerf Vortex Praxis.

For a detailed review of the Nerf Vortex Praxis, click Here.

Nerf Vortex Praxis - Casing Disassembled


Nerf Vortex Praxis - Internals Layout


Nerf Vortex Praxis - Internals Layout Close Up


Nerf Vortex Praxis - Disc Launcher Mechanism


.

Thursday, August 18, 2011

Nerf Vortex Vigilon - Internals Guide!

This guide will serve as a reference for the internals of the Nerf Vortex Vigilon.

For a detailed review of the Nerf Vortex Vigilon, click Here.

Nerf Vortex Vigilon - Casing Disassembled


Nerf Vortex Vigilon - Internal Layout


Nerf Vortex Vigilon - Disc launcher Mechanism (Front View)


Nerf Vortex Vigilon - Disc launcher Mechanism (Back View)


.

Wednesday, August 17, 2011

Nerf Vortex Proton - Internals Guide!

This guide will serve as a reference for the internals of the Nerf Vortex Proton.

For a detailed review of the Nerf Vortex Proton, click Here.

Nerf Vortex Proton - Casing Disassembled


Nerf Vortex Proton - Internal Layout


Nerf Vortex Proton - Disc Launcher Mechanism (Front View)


Nerf Vortex Proton - Disc Launcher Mechanism (Back View)


.

Thursday, August 11, 2011

Mortar Pistol - Re-barrel Mod Guide!

This mod guide will look into re-barreling the Mortar Pistol to convert it from firing large foam "slug" ammo to firing foam darts.

For more information about the Mortar Pistol, read my review of it Here.

Okay, lets start the re-barreling process...

Step 1:

Open the blaster casing and separate the turret from the main body.

Disassemble all the turret parts.


Step 2:

Trim the machine screw ports inside the yellow barrel holder piece, this is to allow more space for the additional air tank-to-turret seal that will be needed to optimize performance.


Step 3:

Create holders to form a secure point to attach the new barrels.

In my example, i cut 13mm SingaPlastics PVC pipes into 6 pieces of 1cm length sections, then i glued them on with high strength 2-part epoxy glue. These PVC pipe sections are an air-tight slot fit for the 1 ft length PETG tubes what i will be using as barrels.


Make sure the epoxy glue has fully cured for maximum strength before use.


Step 4:

Cut out large slot sections at the back of the blue turret piece, this will allow the barrels to be rear loaded.


Step 5:

Install a ring of foam material to create an improved seal between the air tank and turret. I nested and glued the original nozzle into a 1/2" SCH40 Clear PVC pipe section, so that there is a secure base for the foam material to be attached on.


Step 6:

Put everything back together and its completed!


In my unit, i made an additional custom barrel spacer to further support the PETG barrels. It was created by cutting 6 x 1cm length 13mm SingaPlastics PVC pipe sections (to hold the barrels) and 3 x 1cm length 16mm SingaPlastics PVC pipe sections (to link the barrel holders).

All of the PVC pipe sections were then positioned and glued together with high strength 2-part epoxy glue to form a customized PVC "ring" design barrel spacer. :)


Here is a view of the rear loading slots from the left side of the blaster.


The Mortar Pistol fires from its top barrel, so just aim directly down the turret barrels to line up your shots.


With this simple re-barrel mod, the Mortar Pistol can now load and use foam darts. :)


:: Sample Test Fire Data ::

PTG: Parallel-To-Ground (Shoulder height, no elevation)
ATG: Angled-To-Ground (Aimed higher, 30 degrees elevation)

Distance is measured at where the shot lands (Average of 6 shots).

Air tank is filled up with 4 pumps using the stock pump.

Stock Mortar Pistol (Original barrels + Large Foam "slugs")
PTG = 15 ft
ATG = 20 ft

Re-barreled Mortar Pistol (1 ft PETG barrels + Foam darts)
PTG = 110 ft
ATG = 125 ft

Note that the tests were done under controlled conditions with custom calibrated foam darts. The results are sample estimates for reference (your results may differ depending on materials and mod techniques used).

--

Update!

I've managed to test the Mortar Pistol with a hopper clip too.

As i had already installed a 1/2" SCH40 Clear PVC pipe section around the front nozzle, i could just simply connect it directly to my hopper clip, which also uses a 1/2" spec PVC wye joint!

Here is a comparison between the 6-barrel turret vs the hopper clip.


Hopper clip assembled.


Due to the nature of hopper clips, they usually require additional adjustments and testing to get the right foam dart and hopper combination to match the blaster.

Ranges depend on the hopper clip length (and consequently the amount of clip deadspace), along with the foam dart fit in the hopper system. I get around 80-100 ft with my current setup (ranges reduce as the clip empties).

Mortar Pistol - Internals Guide!

This guide will serve as a reference for the internals of the Mortar Pistol.

For a detailed review of the Mortar Pistol, click Here.

Mortar Pistol - Casing Disassembled


Mortar Pistol - Main Parts Separated


Mortar Pistol - Pump / Air Tank / Air Seal Release Assembly


Mortar Pistol - Air Seal Release Assembly Trigger Catch


Mortar Pistol - Pump / Air Tank Detached from Air Seal Release Assembly


Mortar Pistol - Pump Nested within Air Tank


Mortar Pistol - Pump / Air Tank Parts (Positions by Layer)


Mortar Pistol - Air Seal Release Assembly Parts (Positions by Layer)


.

Monday, August 1, 2011

Buzz Bee Rads 12 - Internals Guide!

This guide will serve as a reference for the internals of the Buzz Bee Rads 12.

For a detailed review of the Buzz Bee Rads 12, click Here.

Buzz Bee Rads 12 - Disassembled


Buzz Bee Rads 12 - Priming & Turret Rotation Mechanisms


Buzz Bee Rads 12 - Turret Gear Mechanism


Buzz Bee Rads 12 - Plunger System


.